Halloween Decor-Cheap and Easy
The best part about the holidays is decorating my home for my family. Halloween is not an exception. I just love to see the looks on my children’s faces when they see how I transformed our small base home into a spooky haunt. I do all of my decorating on a budget and try to reuse and recycle as much as I can. I know a lot of us are hurting financially and spending a fortune on decorations just doesn’t fit everyone’s budget. Here are a few tricks I used to get my home a creep-a-fied without using the kid’s college funds. ;)


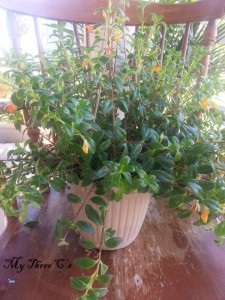
My biggest splurges would have to be the fall plants I bought to decorate my home. I wanted something fun and versatile and that could possibly survive my limited gardening skills. I bought some mums at Home Depot that were on sale for $2.77 and used them to spruce up the skimpy flower beds and around our palm trees. I also bought two hanging plants that were a bit more expensive but would not only last the season. They are heat resistant, and sturdy so I can continue to enjoy them all year long. That is, if I can keep them alive. These are called Goldfish. See the fun orange flower shaped like a little fish? Too funny!

I didn’t have the money to go out and buy fancy hanging baskets and I decided to look around my home for things I could use to give the illusion of a fancy basket. I took Jute rope, old burlap scraps, and some black ribbon I had in my craft room and fashioned a rather nifty cover for the existing basket. I just tied a square of burlap with the jute and then embellished with the ribbon. If you are less prone to burning yourself with the glue gun, you could glue the burlap on the existing basket for more support. (Those of you that follow me on Facebook, know what I'm referring to.)


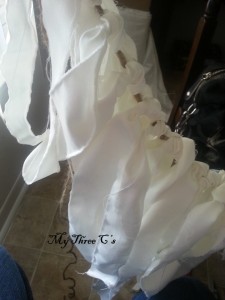
Next I wanted to decorate around the big window on my porch to give it texture, and interest without having to buy expensive Halloween garlands or such. What I decided to do was take old white fabric I purchased at a thrift store and rip it into strips and make a rag curtain. (You could also use thrift store or old white bed sheets.) Using the same jute rope, I cut a piece the length of the window and also added about an inch and a half for good measure. Next I took the ripped pieces of fabric and knotted them to the rope. My ripped fabric pieces measured between a foot and a half, and up to two feet. You want them to be uneven, as it adds to the disheveled, mess of haunted house décor. After that it was all a matter of stapling them to the windows edge. I added a few cut out bats and some orange lights and now I have an eerie little vantage point to spy on unsuspecting trick or treaters. BAWHAHAHAHAHA!

The best part of Halloween décor is the fun monsters and ghouls you can decorate with. Unfortunately, props can run in the hundreds and like you, I don’t have that kind of cash. Creativity is key when trying to be frugal and spirited at the same time. I would start at a thrift store and look for old creepy masks or even paper Mache a scary mask and attach it to a homemade scarecrow. Use old clothes and stuff with newspaper and prop up your spooky guy in a chair. I already had an old British mailbox I use as an outdoor decoration so what I did was string white Christmas lights to the mailbox and tie a foam mannequin head to the top of it. Then secured a wood dowel length wise to the mailbox and draped two layers of old white fabric to the mailbox. I did change two of the white lights to red and secured them with tape so to give the illusion of glowing red eyes. We are now haunted and ready for the 31st!

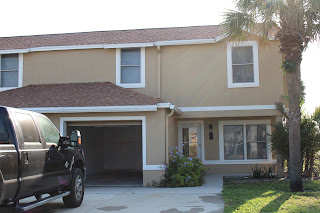
All my other decorations were reused items from previous years or thrift store finds. I also bought some pumpkins which we will carve closer to Halloween. I think our small base house yard looks great and hopefully inspire others to have fun this Halloween. Here are some daytime pictures.....


And here is the 3C Asylum at night......


P.S. I didn’t take any good pictures of my upstairs windows. I had an extra black, plastic tablecloth from a birthday party and taped it to the window edges. I then cut out slits for eyes and inserted red lights, securing with tape as I went along. The result is haunting! Glowing red eyes stalking you as you walk by…….

If you use any of my ideas, please share them with me on facebook www.facebook.com/mythreecs or by email at 3cmomamb@gmail.com. I look forward to hearing from you! Happy Halloween!!!!


My biggest splurges would have to be the fall plants I bought to decorate my home. I wanted something fun and versatile and that could possibly survive my limited gardening skills. I bought some mums at Home Depot that were on sale for $2.77 and used them to spruce up the skimpy flower beds and around our palm trees. I also bought two hanging plants that were a bit more expensive but would not only last the season. They are heat resistant, and sturdy so I can continue to enjoy them all year long. That is, if I can keep them alive. These are called Goldfish. See the fun orange flower shaped like a little fish? Too funny!

I didn’t have the money to go out and buy fancy hanging baskets and I decided to look around my home for things I could use to give the illusion of a fancy basket. I took Jute rope, old burlap scraps, and some black ribbon I had in my craft room and fashioned a rather nifty cover for the existing basket. I just tied a square of burlap with the jute and then embellished with the ribbon. If you are less prone to burning yourself with the glue gun, you could glue the burlap on the existing basket for more support. (Those of you that follow me on Facebook, know what I'm referring to.)


Next I wanted to decorate around the big window on my porch to give it texture, and interest without having to buy expensive Halloween garlands or such. What I decided to do was take old white fabric I purchased at a thrift store and rip it into strips and make a rag curtain. (You could also use thrift store or old white bed sheets.) Using the same jute rope, I cut a piece the length of the window and also added about an inch and a half for good measure. Next I took the ripped pieces of fabric and knotted them to the rope. My ripped fabric pieces measured between a foot and a half, and up to two feet. You want them to be uneven, as it adds to the disheveled, mess of haunted house décor. After that it was all a matter of stapling them to the windows edge. I added a few cut out bats and some orange lights and now I have an eerie little vantage point to spy on unsuspecting trick or treaters. BAWHAHAHAHAHA!


The best part of Halloween décor is the fun monsters and ghouls you can decorate with. Unfortunately, props can run in the hundreds and like you, I don’t have that kind of cash. Creativity is key when trying to be frugal and spirited at the same time. I would start at a thrift store and look for old creepy masks or even paper Mache a scary mask and attach it to a homemade scarecrow. Use old clothes and stuff with newspaper and prop up your spooky guy in a chair. I already had an old British mailbox I use as an outdoor decoration so what I did was string white Christmas lights to the mailbox and tie a foam mannequin head to the top of it. Then secured a wood dowel length wise to the mailbox and draped two layers of old white fabric to the mailbox. I did change two of the white lights to red and secured them with tape so to give the illusion of glowing red eyes. We are now haunted and ready for the 31st!

All my other decorations were reused items from previous years or thrift store finds. I also bought some pumpkins which we will carve closer to Halloween. I think our small base house yard looks great and hopefully inspire others to have fun this Halloween. Here are some daytime pictures.....


And here is the 3C Asylum at night......


P.S. I didn’t take any good pictures of my upstairs windows. I had an extra black, plastic tablecloth from a birthday party and taped it to the window edges. I then cut out slits for eyes and inserted red lights, securing with tape as I went along. The result is haunting! Glowing red eyes stalking you as you walk by…….

If you use any of my ideas, please share them with me on facebook www.facebook.com/mythreecs or by email at 3cmomamb@gmail.com. I look forward to hearing from you! Happy Halloween!!!!

Thanks for sharing the creative ideas of the decor. Halloween is the great festival to celebrate and it seems that you like to decor with lighting. Using the roller blinds nz improves the look of room.
ReplyDeleteThis is excellent information which is shared by you. This information is meaningful and magnificent for us to increase our knowledge about it. Keep sharing this kind of information. Thank you. burlap fabric
ReplyDeleteThanks once again for sharing it. burlap fabric for sale
ReplyDeleteI am heartily thankful to you that you have shared important and essential information with us.
This is excellent information which is shared by you. This information is meaningful and magnificent for us to increase our knowledge about it. Keep sharing this kind of information. Thank you. Read more info about Hydrophilic Non Woven Fabric Manufacturers In India
ReplyDeleteYou wrote an extremely useful article burlap fabric for sale. I gleaned some useful information from this article. Many thanks for writing about it. I wish you continued success.
ReplyDelete